Prototypes often require transitions between screens in a design. For some interactions, you may want to keep the user on the same screen, but show additional information.
Overlays allow you to show new content or information above the current screen in a prototype. Use overlays to prototype:
Alerts or confirmations
Interactive hamburger menus
Tooltips and additional information
On-screen keyboards
Overlay actions
In a prototype connection, an action usually takes the user from A to B. When the action is an overlay, Figma shows the overlay above the current screen.
Figma usually applies interaction settings to just that the connection. When you create an overlay, Figma applies those settings to the overlay itself, not the connection.
This allows you to apply those settings once and reuse that overlay across your prototype.
Tip! You can create interactions between overlays using the Swap overlay action. Learn more in the Swap between overlays section.
Create an overlay
You create an overlay when you define the interaction of a connection. Overlays can be triggered from any object, layer, group or frame. The overlay must be inside a frame.
Click the Prototype tab in the right sidebar.
Hover over the object you want to start the overlay from. Click on the prototype node and drag a connection to the frame you want to become the overlay.
Now you can customize the interaction. There are three aspects of the interaction, the trigger, action and destination.
Select what kind of interaction will trigger the animation.
Select Open overlay from the actions.
Figma determines the Destination based on where the connection ends. For this interaction, you want this to be the overlay frame.
There are a few aspects of an overlay that you can customize:
Position: The location of the overlay relative to the original frame. Choose from seven default options or set a position manually.
Close when clicking outside: Check this setting to dismiss the overlay when a user clicks outside the overlay's dimensions.
Add background behind overlay: Check this setting to add a background color behind the overlay and in front of the current frame. Set both the color and the opacity.
In the Animation section, customize how the overlay will appear. Select the (1) transition and any additional settings, including (2) direction, (3) easing, and (4) duration. Learn how to build prototypes with interactions and animations.
Tip! Add GIFs to your overlays to simulate more advanced animations. GIFs show up as static images in the Editor, but playback as GIFs in Presentation View.
Swap between overlays
When working with overlays, you can choose the Swap overlay action. This allows you to keep the existing settings while you swap one overlay for another.
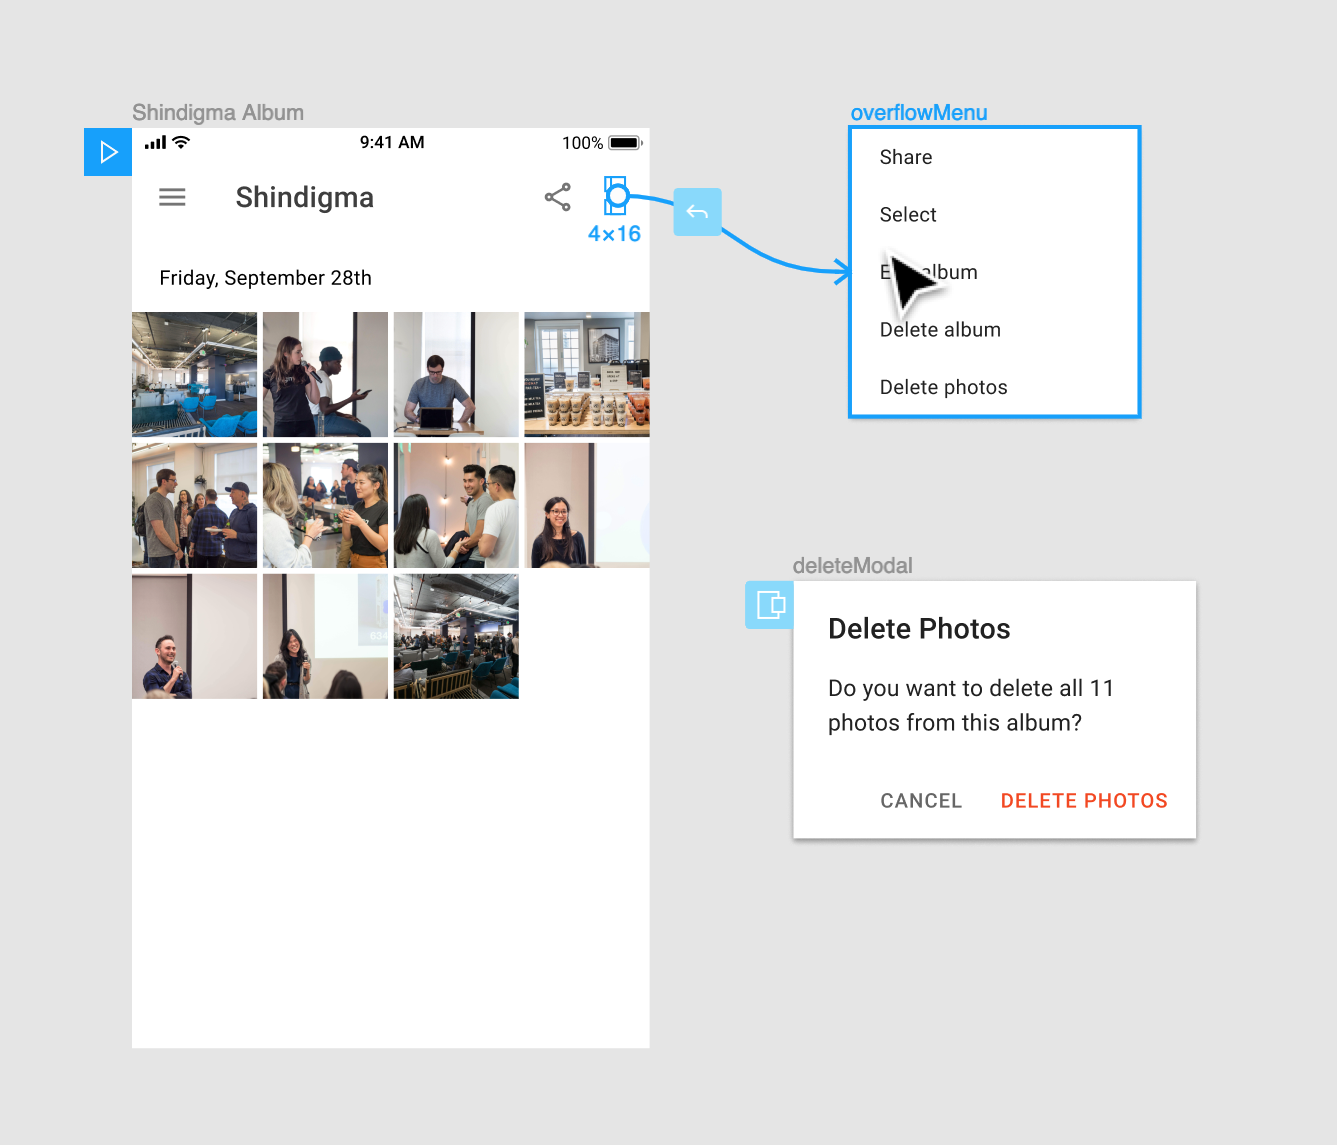
In the following example, we used Swap overlay to show a user interacting with our in-app help menu.
The user clicks on the help icon, which opens the first overlay (Help menu).
They select the Get Help option from the menu.
We replace the Help menu overlay with a Chat window overlay.
Note: Figma doesn't record Swap overlay actions in a prototype's history. When you create a Back action from a Swap overlay transition, Figma will take you back to the previous screen, not the previous overlay.
Use Swap Overlay
Select the first overlay in the canvas.
Open the Prototype tab in the right sidebar.
In the Trigger field, choose the type of interaction you want to use as the trigger.
In the Action field, select Swap overlay.
In the Destination field, select the overlay you'd want to swap to.
Customize the Animation with transition, direction, easing, and duration settings.
Note: You can't set a different position for the new overlay. Figma places the new overlay in the same position as the original overlay.
Edit or delete an overlay
Unlike other actions, overlay settings are applied to the overlay and not the connection. This means you can update the overlay's settings in one place.
You can only edit or remove an overlay in Prototype mode.
Edit overlay
Identify an overlay using the blue icon. This will appear next to the frame in the canvas.
Click the icon to view overlay's settings in the right sidebar.
Make any changes to the overlay, as required.
Tip! You can also access the overlay settings by clicking on a hotspot, or on an arrow from one of the connections.
Delete Overlay
There are a few ways to delete an overlay:
Click on the connection arrow and drag it to an empty part of the canvas.
Click the icon to select the overlay, then press the Delete key.
Remove all connections on the current page. Right-click on a connection and select Remove all interactions.
Note: Video can only be added to files in a paid Education, Professional, and Organization team. Collaborators on free Starter teams can edit existing video in a file but not upload video to it.
Once you add video(s) to your design file, you can edit or adjust basic video qualities. Then, you can add interactions to your videos to start building your prototypes.
Add video to files
Figma doesn't have a specific layer type for video, instead, videos are a type of fill. Since videos are fills, you can add them to any vector or shape.
There are a number of ways you can add video to design files:
A Drag and drop video file from your computer onto the canvas.
C Copy a video from another layer in the current file, or from another file.
D Paste any video from your clipboard into the canvas.
Note: You can also add animated GIFs to your prototypes. GIFs only playback when viewing designs and prototypes in presentation view. Add animated GIFs to prototypes →
If you add a video straight to the canvas, Figma creates an object on the canvas with the dimensions of the original file. If you add a video as a fill to an existing object, Figma uses the name and dimensions of the original object.
View and update video fills in the Fill section of the right sidebar. From the Fill section, you can play and preview your video fill, jump to a specific timestamp, or scrub through the video.
You can also identify layers with video fills in the Layers panel in the left sidebar. Objects with video fills are represented on the layers panel with the icon.
Edit video
Once you’ve added a video to your file, you can edit the video in the following ways:
When you select a video, there is a Video section available on the Prototype tab. This section lets you set a video’s behavior when navigating to its frame in a prototype.
Check the box to autoplay video
Click the Loop icon to loop video
Click the Sound icon to turn the video’s default sound setting on or off
Video interactions
When you create any prototyping connection, there is a trigger that determines what causes the interaction to begin, and an action that defines the response from the triggered event.
The following interaction triggers are available for videos:
When video hits - Trigger set action when the video hits a specific timestamp.
When video ends - Trigger set action when the video completes playing.
The following interaction actions are available for videos:
Play/pause video - Select either Play video, Pause video, or Toggle play/pause.
Mute/unmute video - Select either Mute video, Unmute video, Toggle mute/unmute.
Set to specific time - Set a timestamp to jump to in the video.
Jump forward/backward in time - Select either Jump forward or Jump backward, then set the number of seconds to jump forward/backward in the video.
When you create an interaction between two frames that have the same video, there is a Reset video states toggle in the Interaction details panel. When toggled on, the video will restart from its beginning between frames.
Video interactions within the same frame
You can interact and prototype with videos based on triggers made within the same frame. This can be helpful when trying to build an interactive video player experience.
Create a connection from your starting object to the video file.
Set your desired starting action (e.g., On click).
Set your desired action for the video (e.g., Mute/unmute video).
Video and smart animate
You can use smart animate to preserve a video’s progress when navigating between frames. Let’s say you want to create a prototype where entering a frame begins playback, then clicking on the video navigates to a new frame with a larger view.
Create a connection between the two frames with the same video name. Make sure the video layer names match as well.
Set the animation setting to Smart animate.
In the Interaction details panel, uncheck Reset video states.
Video and interactive components
Use interactive components to prototype video interactions in a single frame, like previewing playback on hover.
Tip! For an even more efficient workflow, you can quickly toggle between the Design and Prototype tabs using the keyboard shortcut ShiftE.
Flows and starting points
With prototyping in Figma, you can create multiple flows for your prototype in one page to preview a user's full journey and experience through your designs.
A flow is the network of frames and connections in a single page. A prototype can map out a user's entire journey through your app or website, or it can focus on a specific segment of it via its own flow. For example: your prototype covers all possible interactions on an eCommerce site. Within the prototype, you have flows for creating an account, adding items to a cart, and checking out.
Figma creates a flow starting point when you add your first connection between two frames. There are a few other ways to add a flow starting point to your prototype:
With the starting frame selected, click in the Flow starting point section of the right sidebar.
Right-click on the frame, then click Add starting point.
Duplicate a frame with an existing starting point.
Note: A top-level frame can be part of multiple flows, but can only have one starting point. Frames nested within a top-level starting frame can have connections that navigate the user around multiple flows. For example, Log in and Sign up buttons can be nested in the same starting point frame, then be connected to frames in separate flows for each experience.
Create connections
Select the hotspot for the connection.
Click to create the connection.
Drag it to the destination.
If there are no existing connections, Figma will make the first frame a starting point.
Tip! You can create connections from multiple objects to the same destination frame at the same time—saving you time and effort when building out your prototype flows. To do so, select multiple starting hotspots on your canvas, then click and drag the icon to the destination.
A hotspot is where the Interaction takes place. A hotspot can be any object within the original frame e.g. a link, button, image or icon, etc.
Connections are the blue arrows or "noodles" that connect the hotspot to the destination. We apply the interaction and animation settings via the connection.
A flow is the network of connected frames that form a path through a prototype. Each flow has its own starting point. You can have multiple flows within a prototype.
The starting point is the first frame of a flow. Set multiple starting points to show different flows of the prototype in Presentation view.
The trigger determines what type of interaction with the hotspot will cause the prototype to advance. This could be a mouse or touch interaction e.g. tap, drag, click, hover, etc.
The destination is where the transition ends. This must be a top-level frame - a frame that is added directly to the canvas - and not an object within a frame. If we think of moving from A to B, A is the hotspot and B is the destination.
The action defines the type of progression is occurring in the prototype. For example, the action could be to navigate to another frame, or open an external URL.
The animation settings determine how the prototype moves from one frame to the other. You can control the type of animation, as well as the speed and direction.
A transition is the type of animation. This defines how the action moves to the destination.
The direction controls the direction that the transition comes from. Choose between left, right, top or bottom.
The duration controls the time it takes to complete the animation. The shorter the duration, the faster the transition. Select a duration between 1ms and 10000ms (10 seconds).
Easing affects the acceleration of the animation, i.e. whether it starts slow or fast. This allows you to build animations that feel more natural.
Overlays are frames that appear above the current screen or frame. You can use overlays to create tool-tips, interactive menus, alerts, or confirmations.
Overflow behavior allows you to define how your prototype responds to scrolling. This allows you to create more advanced user interactions e.g. carousels, galleries, or interactive maps.
Choose which device will be shown when presenting your prototype. Define both the device and the model.
The background color lets you define the color in the background of your prototype.
If you have a prototype with portrait and landscape frames, you can select an orientation. The orientation is set for the entire prototype. It's not possible to switch between portrait and landscape view within a prototype.
A preview will show you how something will look or work in the prototype. We show previews for both animations and prototype device settings.
Anyone with can edit access to a file can create prototypes.
Anyone with can view access to a file, or can view prototypes only access, can view prototypes.
Prototypes replicate how users might interact with your designs. You can make connections between frames to create flows, or pathways, through an interactive design.
Create a connection
The connection consists of three parts:
Hotspot: where the user's interaction will take place. A hotspot can be the frame itself, or an object within the frame. You can create a hotspot on anything, like a button, icon, or heading.
Connection: the arrow or "noodle" that connects the hotspot to the destination. Both the Interaction and Animation are determined through the connection.
Destination:the next step in our prototype where a connection ends. In most cases, the destination must be a top-level frame. Only connections using the Scroll to action can be set to a destination within the same top-level frame.
What are top-level frames? Frames you have added directly to the canvas. In a prototype, this would be an individual screen in your design.
In Figma, you can place a frame within another frame. We call this process nesting. For Figma to consider a frame as a top-level frame, you must not place it within another Frame.
Top-level frames have bolded names in the Layers panel of the left sidebar.
Navigate to the Prototype tab of the right sidebar.
Select a layer or object for the connection's hotspot.
In our example below, we add a hotspot to the frame on the left. The connection takes us to the destination, which is the frame on the right.
Create and edit connections in bulk
Create connections in bulk
You can create connections from multiple objects at once. This can help you save time when creating multiple connections to the same destination.
Select your starting objects, or hotspots, where the connections begin. You can select multiple objects via one of the following methods:
Select an initial object, then hold down shift while clicking additional objects.
Drag your cursor across any objects you want to select. This will create a blue box around the selected objects.
Click from the border of one of the selected objects.
Hold and drag the connections to the destination frame.
All selected objects will now have connections to the same destination frame.
To edit the interactions or animations of the created connections, use the Interactions menu from the Prototype tab of the right sidebar.
Edit connections in bulk
If you have multiple connections, you can edit the destination of those connections at the same time.
Navigate to the Prototype tab of the right sidebar in order to see all created connections.
Select the connections you want to edit. You can select multiple connections via one of the following methods:
Select an initial connection, then hold down shift while clicking additional connections.
Drag your cursor across any connections you want to select. This will create a blue box around the selected connections.
Hold and drag the connections to a new destination frame. You can also select the interaction from the right sidebar and change the destination frame from the Interaction details panel.
To edit the interactions or animations of the selected connections, use the Interactions menu from the Prototype tab of the right sidebar.
Create an interaction
Once you have created a connection, you can define the type of interactions users can have with it. You're able to create multiple interactions from the same layer or object.
Navigate to the Prototype tab of the right sidebar.
Select a layer or object for the connection's hotspot.
Click the on the right of the frame's bounding box and drag it to the destination frame. You can also click the in the Interactions section of the Prototype panel, then select the destination frame using the dropdown menu.
Once the connection has been made, use the Interaction Details panel to adjust the trigger, action, and destination.
A single object can have:
Any number of Key[board]/Gamepad and Drag interactions. This lets you use multiple drag directions and keyboard/gamepad triggers.
One of each of the following interactions:
On Click / On Tap
While Hovering
While Pressing
Mouse Enter
Mouse Leave
Mouse Down / Touch Press
Mouse Up / Touch Release
After Delay
Note: You're not able to combine On Click / On Tap with While Hovering, since the action for the first interaction will make the action from the second on that object unreachable once executed.
Trigger
The trigger defines what type of interaction will cause the prototype to advance forward. This could be a mouse click, touch gesture, or the time elapsed in the current frame.
The action defines what happens when the user interacts with the hotspot. This could mean moving to another frame, engaging an overlay, or opening a link.
The destination is the last step in a prototype interaction. This could be another screen in the prototype, or an overlay that appears above the current screen.
Use the Destination field to select the frame that specific interaction will end on. Or, click on the connection in the canvas and drag it to the next frame. Figma will make that next frame the destination.
Tip! Prototype faster by copying interaction details and pasting them on other frames.
Select a frame with an existing interaction.
In the Interactions section, click to the left of an interaction until its line is highlighted in blue.
Press ⌘ Command / ControlC to copy the interaction details.
Select another frame.
Press ⌘ Command / ControlV to paste the interaction details.
Adjust the animation
The Animation settings determine how the prototype moves from one Frame to the other.
You can then adjust a few settings related to the transition:
Direction
Direction controls which way you want the transition to move in. Choose between Left, Right, Down, and Up.
Easing
Easing determines the acceleration of the transition between a starting frame and its destination, also known as keyframes, by using a mathematical function. Keyframes can be two frames in an interaction, like the transition from one screen to another, or the beginning and end states of a single frame, like an object changing color.
Duration controls how long it takes to complete the Transition. You can choose a duration between 1ms and 10000ms (10 seconds).
Smart Animate matching layers
Smart Animate looks for matching layers, recognizes differences, and animates layers between frames in a prototype. Check this box to apply the Smart Animate transition to any layers that match between frames.
Overflow behavior allows you to define how your prototype responds to scrolling. Use Overflow behavior to add vertical and horizontal scrolling, or multi-directional panning to your prototype.
You can only apply overflow behavior to frames and components.
If you add a prototype connection from a main component, and use instances of that component in your designs, the prototyping connections of the instances will be inherited from the main component.
Use inherited prototype connections to connect:
A mobile app tab bar placed at the bottom of multiple screens
An arrow button to navigate back to the previous screen
A website footer or navigation menu
Any component used for navigation that appears frequently throughout your design
Add connections from main components
To prototype with main components:
Check that the main component is on the same page as the designs that contain the instances. Components from team libraries can't be prototyped this way.
Use instance(s) of the component in your designs.
Click the Prototype tab at the top of the right sidebar.
Click and drag from the to create at least one connection from the main component.
In this example, the mobile app design has a persistent tab bar at the bottom of the screens. We connect the tabs of the main component to their associated screens, and all instances of the tab bar inherit the same interaction. Without a main component, we would need to connect each tab of every tab bar individually.
Note: Figma won't display the inherited connections on the canvas by default. Select the instance to view its inherited connections.
Anyone with can edit access to a file can create and edit prototypes.
Overflow behaviorcontrols how users can interact with content that extends beyond a device's dimensions.
Scroll up or down on a long page of content
Scroll left-to-right to view different elements in a slider.
Navigate between images, articles or posts in libraries and galleries.
Pan or scroll around in any direction, like in an interactive map.
Overflow behaviors
You can only apply overflow behavior to frames. This applies to frames that are directly on the canvas (top-level frames), as well as frames nested within other frames or layers.
To apply overflow behavior, the frame must have content that extends beyond its bounds. If you change the bounds of the frame so that all the content fits inside it, regular scrolling will apply.
Figma supports 3 different overflow behaviors: Vertical, Horizontal, and Vertical and Horizontal.
Vertical scrolling
Vertical scrolling allows users to swipe or scroll up and down within a frame. Use this behavior to mimic scrolling down a long website, or page of content within an app.
Note: You won't always need to apply overflow behavior to mimic vertical scrolling. Anyone can scroll the full length (or width) of a frame in a prototype.
Horizontal scrolling
Horizontal scrolling allows users to swipe or scroll left and right within a frame, while maintaining their vertical position. Use this to create sliders for content, like products, galleries, and libraries.
Horizontal and vertical scrolling
Horizontal and vertical scrolling lets users navigate in any direction within a frame: left, right, up, or down. Use this behavior to support scrolling in any direction, like viewing a map or enlarged image.
Apply overflow behavior
To apply overflow behavior to a frame, there must be child objects that extend beyond its bounds. You can only apply one overflow behavior to each frame.
These instructions also apply to components. Select the Instance in the canvas, click Go to main Component in the right sidebar, then adjust the bounds of the original Component.
If no content extends beyond the frame, Figma will show an error message when you try to apply overflow behavior. To apply overflow behavior, you'll need to adjust the frame's bounds.
To adjust a frame's bounds:
Select the frame you want to update.
Open the Design panel in the right sidebar.
Hover over the frame's bounds in the canvas until the cursor appears.
Drag the bounding box to resize the frame. Hold down the modifier key to ignore Constraints:
Mac: ⌘ Command
Windows: Ctrl
If you want to hide content that extends beyond the frame, check the box next to Clip Content.
Constraints define how an object behaves when you resize them. To temporarily ignore Constraints, hold down the modifier key as you resize the frame:
Mac: ⌘ Command
Windows: Ctrl
Create fixed objects in a prototype
There may be some elements in a prototype that you don't want to move as the prototype scrolls. For example: apply top constraints to fix a status bar to the top of the device, or bottom to fix a menu to the bottom.
You can use constraints to fix an object's position in a scrolling prototype. Within the constraints section, there is a Fix position while scrolling setting. This lets you to lock an object's position and makes sure it stays in the same location, even as you scroll.
Note: When you make a fixed object, Figma will move those layers above the other layers in your design. It's not possible to position scrolling objects above fixed layers.
To create a fixed object:
Select the object, group or component in the canvas.
Open the Design panel in the right sidebar.
In the Constraints section, apply vertical and horizontal constraints.
Check the box next to Fix position when scrolling.
Figma will move these objects above your other layers so that they are in the FIXED section of the Layers Panel.
Preserve scroll position
When we create prototypes, we want our interactions to feel as much like the real thing as possible. For some interactions, we need to create an illusion that our designs are truly dynamic.
Preserve scroll position allows you to maintain the same scroll location when you move between two screens. This applies to scroll depth in a vertical scroll, as well as the user's location inside a horizontal scrolling element.
Anyone with can edit access to a file can create and edit prototypes.
In creating prototypes, we want to our interactions to feel as much like the real thing as possible. For some interactions, we need to provide an illusion that our designs are truly dynamic.
The preserve scroll position setting lets you keep the same scroll location when you transition between screens. This applies to vertical scroll depth, as well as horizontal location.
Figma automatically preserves your scroll position for Smart Animate.
Preserve scroll position is optional for Instant or Dissolve animations.
Preserve scroll position is not available for Slide, Push, or Move animations.
Vertical scroll
In our example below, we want to show the full size of our content when a user clicks on the preview. We have two screens in our prototype:
Screen 2 shows the our newsfeed design with a preview of the element.
Screen 3 shows how the same page will look with the full size element.
If we leave Preserve scroll position unchecked, the user can scroll down our prototype and click on our interactive element.
Figma will take them to the next page in our prototype (Screen 3), but they will be taken to the very top of the frame.
This makes it obvious to the user that we have moved to a different screen. The user now has to scroll down to view the full size element, breaking the illusion we've constructed or confusing them.
If we check Preserve scroll position, the prototype remembers the user's scroll depth on the current frame.
When the interacts with the prototype, Figma takes them to the same scroll depth on the next frame. From the user's perspective, our content looks to expand on the same page.
Horizontal scrolling
In our example below, we want users to be able to see a different visual state, when they click on an option in the gallery.
Screen 1 shows our newsfeed that lets users scroll left-to-right through a gallery of images.
Screen 2 shows us what happens when you select an option from the gallery. We add a border around the image and a plus icon in the center.
If we don't check Preserve scroll position, the user can scroll down and across to view . If they click on an object, Figma will load Screen 2 at the top of the frame. The user will then have to scroll down and across to see that they have selected the last object.
If we check Preserve scroll position, Figma remembers the user's position and takes them to the last object in its selected state.
Users with can edit access to a file can create and edit prototypes.
Users with can view access to a file or prototype can view prototypes.
Smart animate looks for matching layers, recognizes differences, and animates layers between frames in a prototype.
You can select Smart animate from the list of transitions, when building a prototype. You can also apply Smart animate with other transitions to create seamless animations.
Smart animate allows you to quickly create advanced animations. Use Smart animate to replicate:
Smart animate looks for matching layers that exist across multiple frames. Figma takes into account both the layer's name and where it sits within the hierarchy.
For layers that match between frames, Figma recognizes what's changed and applies transition to animate between them.
You can apply smart animate to entire objects or Components, as well as individual layers within a Component or group.
It's likely that more than one of an object's properties will change between Frames. We've isolated each of the properties we support below, so you know what to expect.
Scale
If an object changes in size between frames, Figma will animate it shrinking or growing.
Position
Figma recognizes if an object's location, the x and y co-ordinates, have changed. It will then animate the object moving from its current position, to its position in the destination frame.
Opacity
Smart animate can also recognize a layer or object's opacity. You can adjust opacity to make an object to appear or disappear between frames.
Set the opacity of the layer to 0%, instead of toggling the layer visibility. Figma will apply a dissolve transition to animate the layer's opacity.
You can adjust opacity through a layer's Fill properties, as well as through the Layer property. Smart animate will apply to both.
We recommend adjusting the entire layer's opacity. Adjust the opacity Layer setting in the Design tab of the right sidebar.
Rotation
Smart animate also takes the layer's rotation and orientation into account.
You can rotate an object using the rotation field in the right sidebar or in the canvas itself. Hover over the corner bounds of an object until the rotation cursor appears.
Rotate a single layer at once, or rotate a group of them around a single anchor point.
Fill
Figma will smart animate any changes to an object's fill. This allows you to animate changes between solid colors, gradients and even image fills.
Things to note
Figma doesn't support smart animate for changes to Effects, or moving between shapes. If a property isn't supported, Figma will apply a default dissolve transition.
Figma doesn't support smart animate for overlay actions. This is because Figma treats overlays as new frames. You can use smart animate when swapping between overlays, if those overlays have matching layers.
If you introduce a new layer in the destination frame, smart animate will dissolve the layer into view.
If a layer's properties stay the same between two frames, Figma won't animate that layer at all. This is great for status bars and menus, and interactions when you don't want to move to a different UI.
If you check the Fix Position when Scrolling checkbox for any layers, Figma will add them to the list of Fixed layers. Smart animate handles layers differently when you combine Smart animate with other transitions.
Apply smart animate
There are two ways you can use smart animate in your prototypes. As a stand alone transition, or by using Smart animate matching layers with another animation.
Smart animate
Select Smart animate in the transition field to animate between two frames.
Open the Prototype tab in the right sidebar.
Select layer, group, or frame in the canvas. A connection node will appear on the right-edge.
Click on the node and drag it to the next frame to create a connection.
Define the Interaction in the right sidebar by choosing a trigger and action. Figma will set the second frame as the destination.
In the Animation section, select Smart animate from the transition field.
Apply Easing to the transition, or change the Duration (optional).
Repeat for any other frames you want to smart animate.
In our example below, we have three frames with some matching layers. We want smart animate to animate removing the Abel Tasman Coast Track from our list of favorites.
Smart animate now moves us smoothly between each frame in our prototype!
Smart animate matching layers
If you want to smart animate some layers in your prototype while using another main transition, you can check a box to Smart animate matching layers.
Figma treats fixed layers differently when using smart animate with other transitions.
Layers that don't match: Figma will use the main transition you select.
Layers that do match: Figma will Smart animate any differences for supported properties.
Fixed layers that do match: Figma won't apply any transition.
Fixed layers that don't match: Figma will apply a dissolve transition instead of the transition you select.
To use Smart animate matching layers, check the box in the right sidebar when adjust the animation:
In our example below, we have a status bar and navigation that exist across all three frames. We want these to stay in place when we switch between tabs.
We've selected a Push Transition to move between Frames. We choose not to check the box next to Smart animate matching layers.
When we view our Prototype, we can see that everything in our destination frame uses the Push transition. This makes it pretty obvious that we're moving between separate screens in a prototype.
If we check the box next to Smart animate matching layers, our status bar and navigation stay in place, while the other content uses Push.
Tips for Smart Animation
Before smart animate, Figma didn't place much importance on layer names. As Smart Animate is reliant on Layer name and hierarchy, this may require you to use a different approach.
We've outlined a few ways to troubleshoot unexpected smart animate results below.
Tip! We recommend increasing the duration while building your prototype. This lets you see what's happening and make any adjustments.
Layer names
One quick way to create frames for smart animate is to duplicate them. This keeps the naming consistent between each frame. You can then add and remove layers to each frame, as needed.
Figma names frames and layers based on the way you duplicate or copy and paste them.
Within a frame: Figma numbers layers them sequentially. For example: Frame 1, Frame 2 etc.
Between frames: Figma uses the same name. For example: If you copy Rectangle 1 from one frame, Figma will paste it as Rectangle 1 in the next frame.
You may have objects or layer that exist across frames, but have different names in each. Or, you may have the opposite problem - layers that all have the same name, which you don't want to match.
Figma has also made it easier to identify layers or objects that exist - or match - between frames. This applies to all layers, groups, frames, and Components.
Open the Prototype tab in the right sidebar.
Hover over an object or layer in the canvas.
Figma will highlight that layer in any other frames it exists in.
Layer order and hierarchy
Smart animate and Smart animate matching layers take into account the layer order, or hierarchy of your layers.
Normally, Move in or Slide in will transition the entire destination frame above the original frame. With smart animate matching layers, Figma will move or slide in layers based on their hierarchy, which can cause some confusing or unexpected results.
In our screenshot below, we have two matching objects between our frames ( Explorer 1 and Explorer 2). These are the Status Bar and the Navigation.
If we have layers above any matching layers, Figma will animate them above the destination frame. In our screenshot below, we can see layers from Explorer 1 appear above the destination frame.
By moving our matching layers to the top of the hierarchy instead, we can make sure the entire destination frames slide above the original frame.
Group layers
To be more precise in deciding what to smart animate, Figma matches layers based on their name and hierarchy. This also lets you quickly un-match layers between frames.
Let's say that we have five rectangles in each of our frames. These rectangles contain different content between each frame. We labeled them as Trip 1 to Trip 5 across all three frames.
When we try apply a Push transition, smart animate recognizes them as matching layers. Instead of treating these rectangles as new content, Figma smart animates the change to their position.
To change this behavior, we can group the rectangle trips in each frame and give them a unique name.
When we preview our transition, smart animate no longer recognizes these as matching layers. Our content will Push in together, making our Prototype look much more realistic.
Smart animate with Slide in and Move in
There are a few things to consider when using Smart animate matching layers with Slide or Move transitions.
When selected, Figma will animate any matching layers between frames. This means Figma can't animate the entire destination Frame (B) over the initial Frame (A), like it normally would.
Figma also doesn't include a frame's fill as part of the animation. This can cause layers to overlap, making the transition look messy.
To prevent this, we can add a rectangle with a solid fill behind our other layers. Now, when we view our prototype, the content in each frame slides in together.
Anyone with can edit access to the file can adjust the prototype Presentation view settings.
Users can preview and interact with prototypes in Presentation view. You can choose how Figma presents the prototype using the prototype settings.
Prototype settings
Access and adjust your prototype settings in the Prototype panel of the right sidebar by clearing your selection in the canvas.
Select a Device and Model
Preview your prototype
Select Background color
View and present Flows
Tip! You can also access these settings by clicking the Show prototype settings button when editing a connection.
Device
Use Device settings to control how your prototype looks in Presentation view.
Device
Figma has a number of popular device presets. The dimensions of your prototype frames will define what options are available.
Frame preset: If you used a frame preset, Figma will select a device that matches that preset. You can select another device if desired. For example: if you used the iPhone 11 Pro Max frame preset, Figma will select the iPhone as the device too.
Custom Size (Fit) will automatically scale the design, so that it fits within the screen you are viewing the Prototype on.
PresentationSize (Full) will display the Prototype to a size that allows it to be displayed on the screen, in its entirety.
Orientation
Control the orientation of the device in Presentation view. Choose from:
Portrait
Landscape
Note: It's not possible to switch between orientations within a prototype. This is something to bear in mind if you have frames in your prototype across both orientations.
Model
Some devices offer variations on model. For example: the iPhone 11 Pro Max comes in four different colors. You can choose which color-way you would like to use.
Depending on the device you selected, you can specify a certain Model.
Preview
View a Preview of how the device will look in Presentation view.
Background color
Set the Background color of the prototyping screen. You'll see this color behind your selected device.
Set this to a neutral color, or customize this with a brand color for extra polish.
Starting point
With prototyping in Figma, you can create multiple flows for your prototype in one page to preview a user's full journey and experience through your designs. A flow is a path users take through the network of connected frames that make up your prototype. For example, you can create a prototype for a shopping app that includes a flow for account creation, another for browsing items, and another for the checkout process–all in one page.
When you add a connection between two frames with no existing connections in your prototype, a flow starting point is created. You can create multiple flows using the same network of connected frames by adding different flow starting points.
Note: If there are no prototyping connections between frames in your file, Figma orders frames as they are in the canvas, by row (left to right) then column (top to bottom).
There are a few ways to add a flow starting point to your prototype:
Select the starting frame, then click in the Flow starting point section of the right sidebar.
Select and right-click the starting frame, then click Add starting point.
Add a connection between two frames with no existing connections or starting points.
Duplicate a frame with an existing starting point.
Edit flow name
Once you've created a flow, Figma will name it Flow 1 by default, with additional flows being Flow 2, Flow 3, and so forth. You can rename a flow and add a description at any time.
There are a couple ways to rename a flow:
Double-click the starting point flag on the canvas and edit.
Select the starting frame and edit the name field in the Flow starting point section of the right sidebar.
Once renamed, the flow name is displayed in the frame's starting point flag and the left sidebar in Presentation view. You can see all starting points for a prototype when you clear your selection while in the Prototype tab or the right sidebar.
Add flow description
Flow names and descriptions are displayed in the left sidebar when in Presentation view. Descriptions can be formatted with bold text, numbered or bulleted lists, and hyperlinks. Use descriptions to provide prompts to usability test participants or additional context and documentation for your team.
To add a flow description:
Select the frame with the flow starting point.
Click in the Flow starting point section of the Prototype tab.
Add a rich text description.
Click to save the description.
Once added, the description is displayed in the left sidebar in Presentation view. You can hide the flows sidebar and descriptions at any time.
Move starting point
By default, Figma uses the first connection you create as the Flow starting point. You can move a starting point to another frame. To do so, click and hold the blue starting point flag next to the current starting frame. Drag the icon to the new starting frame. This must be a top-level frame, a frame that isn't nested within another layer or frame.
Note: If you enter Presentation view with nothing selected, your prototype will start from the set starting frame. If you select another frame in the Editor before presenting, your prototype will start on the selected frame. If you select another frame after presenting it won't impact what you see in Presentation view.
Copy flow link
There are a couple ways to share the flow link for a specific starting point with usability testers and collaborators.
From the Prototype tab of the right sidebar:
Press Esc or click an empty space on the canvas to clear your selection.
Hover over the flow name and click to copy the link.
From Presentation view:
Select the flow you want to share from the left sidebar.