Before you Start
Who can use this feature
Users on Any plan
The concepts outlined here are valid for any level of access. These terms aren't specific to Figma, but they will help you understand some behaviors and dependencies in Figma.
We use the terms Parent, Child and Sibling to describe relationships between objects in Figma.
These terms are commonly used to explain similar relationships in web development, or programming.
In this article, we'll clarify what we mean when we use these terms.
If you have a background in object-orientated programming (OOP), these relationships are a little different. Parent/child relationships in Figma don't really relate to inheritance.
In Figma, these relationships function more like the Document Object Model (DOM). That is, containers with elements inside them.
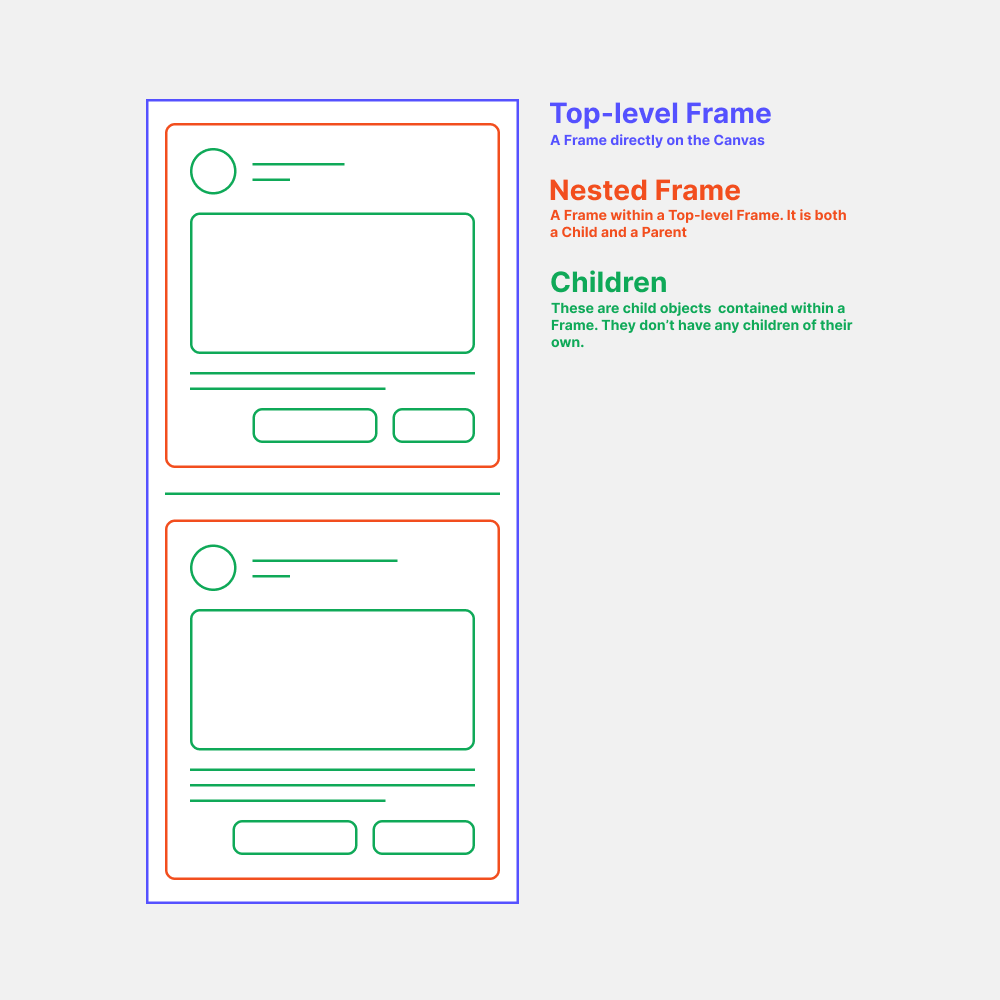
Parents children and siblings
We use these terms to explain how objects relate to other objects on the canvas.
Parents are objects - namely frames, components and groups - that contain other objects.
Children are objects that are contained within a parent.
Siblings are objects that are contained within the same parent.
- In a frame with objects inside it, the frame is a parent and any objects in it are children.
- A frame by itself is not automatically a parent. It is only a parent if there are objects within it.
- If a parent contains more than one object, the child objects are siblings.
- Objects — like frames, groups and components — can be both parents and children.
Parent and child interactions
While these terms aren't explicitly used in the product, they are important for understanding how objects behave and relate to one another in Figma.
Unlike their biological counterparts, they function as containers (parents) and contents (children) that influence each other. Rather than a defined lineage with explicit inheritance.
Properties
There are parent/child relationships that involve influence. In a lot of circumstances, the parent will be a Frame.
You can add the following properties to a Frame that influences all their child objects:
- Layout Grids: Create visual structure to your designs
- Auto Layout: Create dynamic Frames that respond to their contents
- Clip Content: Hide any objects within the Frame that extend beyond the Frame's bounds
You can also add properties to a child object:
- Constraints: Define how child objects will respond when you resize the parent Frame
Parenting behavior
When you move an object in the canvas to a new location, Figma will decide whether or not to reparent the object.
Reparenting means that the object is taken out of its current parent and is nested within another parent object. For example, you could move an object from one parent frame and move it to another frame.
Figma uses the same logic for parenting when you are adding new objects to a frame.
The default behavior is:
- If an object is smaller than a frame, we will make it a child of the frame
- If an object is larger than a frame, then we will not make it a child element
Bypass default behavior
You can choose to bypass the default behavior:
- When adding objects, hold down the Space bar to prevent Figma from reparenting an object
- When moving an object out of a frame's bounds, hold the Space bar to keep an object within the current parent