Before you start
Who can use this feature
The remote server is available on all seats and plans.
The desktop server is available on a Dev or Full seat for all paid plans.
You must use a code editor or application that supports MCP servers (i.e. VS Code, Cursor, Windsurf, Claude Code, Codex). See our MCP catalog for a full list of supported clients.
The Figma MCP server helps developers explore and implement designs quickly and accurately:
-
Use your agentic tools to create and modify native Figma content directly in Figma Design, FigJam, and Figma Slides.
Note: We're quickly improving how Figma supports AI agents. This will eventually be a usage-based paid feature, but is currently available for free during the beta period.
- Get design context and code from your Figma designs, FigJam, and Make files
- Capture your live UI as design layers, bringing the interfaces rendered by your code to Figma Design files
- Enhance the way you work with design components and Code Connect
- Use fonts uploaded to your account with the MCP Server and Figma Agent
Note: This guide is a high-level look at what's offered by the Figma MCP server. For specific instructions about using the server and example prompts, see:
- Get started with the Figma MCP server
- Remote Figma MCP server installation (preferred)
- Desktop Figma MCP server installation
- Figma skills for MCP
- Tools and prompts
- The Figma MCP collection
Detailed articles are also available in the Figma developer documentation.
The tools within Figma’s MCP server bring additional context from Figma into your workflow, so your code doesn't just match your existing systems, but your design, too.
MCP servers are part of a standardized interface for AI agents to interact with data sources using the Model Context Protocol.
Note: This page is a general overview of the Figma MCP server. For detailed instructions and code samples, see the Figma MCP server developer documentation.
With the server enabled, you can:
-
Let your agent write directly to the canvas in Figma Design and FigJam
Create and modify native Figma content directly from your MCP client. With the right skills, agents can build and update frames, components, variables, and auto layout in your Figma files using your design system as the source of truth.
Note: This feature requires the remote Figma MCP server. We're quickly improving how Figma supports AI agents. This will eventually be a usage-based paid feature, but is currently available for free during the beta period.
This feature is continuously being improved. If you encounter issues, you can report the issues using Fig, our support chatbot, or by emailing support (paid plans).
-
Generate designs from the live UI of your web apps and sites
Turn live UI from your browser (production, staging, or localhost) into editable design layers in Figma. Send pages, elements, or whole flows to Figma Design for exploration, alignment, and refinement.
Note: This feature requires the remote Figma MCP server and is currently supported by select clients.
This feature is continuously being improved. If you encounter issues, you can report the issues using Fig, our support chatbot, or by emailing support (paid plans).
-
Generate code from selected frames
Select a Figma frame and turn it into code. Great for product teams building new flows or iterating on app features.
-
Extract design context
Pull in variables, components, and layout data directly into your IDE. This is especially useful for design systems and component-based workflows.
-
Retrieve FigJam resources
Access content from your FigJam diagrams and use it in your code generation workflow. Incorporate early-stage ideas, flows, or architecture maps directly into development.
-
Retrieve Make resources
Gather code resources from Make files and provide them to the LLM as context. This can help as you move from prototype to production application.
-
Keep your design system components consistent with Code Connect
Boost output quality by reusing your actual components. Code Connect keeps your generated code consistent with your codebase.
Set up the MCP server
You can connect the Figma MCP server in two ways:
-
Remote MCP server (preferred): Connects directly to Figma’s hosted endpoint at
https://mcp.figma.com/mcp. Learn how to install the remote MCP server. - Desktop MCP server: Runs locally through the Figma desktop app. Learn how to install the desktop MCP server. The desktop MCP server is primarily for specific use cases for organizations and enterprises. For the broadest set of features, use the remote MCP server.
Note: The MCP server and Figma Agent can access fonts uploaded to your account. Learn how to add a font to Figma.
Connect the MCP server to your editor
Follow instructions for your specific editor to connect to the Figma MCP server, either locally or remotely. Some clients also support skills, which add agent-level instructions that help AI tools work more effectively with Figma designs:
| Client | Desktop server support | Remote server support | Write to canvas (remote only) | Plugin/skills support |
| Amazon Q | ✓ | |||
| Android Studio | ✓ | ✓ | ||
✓ |
✓ |
✓ |
||
| ✓ | ✓ | ✓ |
||
| ✓ | ✓ | ✓ |
||
| ✓ | ✓ | ✓ |
||
✓ |
✓ |
✓ |
||
| ✓ | ✓ | ✓ |
||
✓ |
✓ |
✓ |
||
✓ |
✓ |
✓ |
||
| Gemini CLI | ✓ | ✓ | ||
| Kiro | ✓ | ✓ | ✓ |
|
| Openhands | ✓ |
|
||
| Replit | ✓ |
|
||
| VS Code | ✓ | ✓ | ✓ |
|
| Warp | ✓ | ✓ | ✓ |
|
Xcode (beta) |
|
✓ |
✓ |
About Skills
Skills provide guidance for how an agent should complete specific tasks, using a combination of MCP tool calls and detailed instructions.
While the Figma MCP server exposes individual tools, Skills help agents understand which tools to use, how to sequence them, and how to apply the results when working with Figma designs.
Skills can guide agents through workflows like:
- Connect Figma design components to code components using Code Connect
- Generate design system rules aligned to your codebase
- Translate designs into production-ready code
Skills don’t replace MCP connections or add new MCP capabilities. They reduce setup and guesswork by packaging recommended workflows into reusable instructions.
To learn more about skills:
Note: Skills are also available from the Figma Community and via community contributions in the Figma community-resources repo on GitHub.
Tip: For the latest list of supported editors and clients, check out our MCP Catalog.
Prompt your MCP client
The Figma MCP server introduces a set of tools that help LLMs translate designs in Figma. Once connected, you can prompt your MCP client to access a specific design node.
For a complete list of tools and examples, see Tools and Prompts.
First, follow the instructions to install the Figma MCP server for your preferred MCP client. We provide instructions for:
For other MCP clients, follow the instructions in your client's documentation for adding MCP servers. See the table under Connect the MCP server to your editor for links.
Example: Get design context
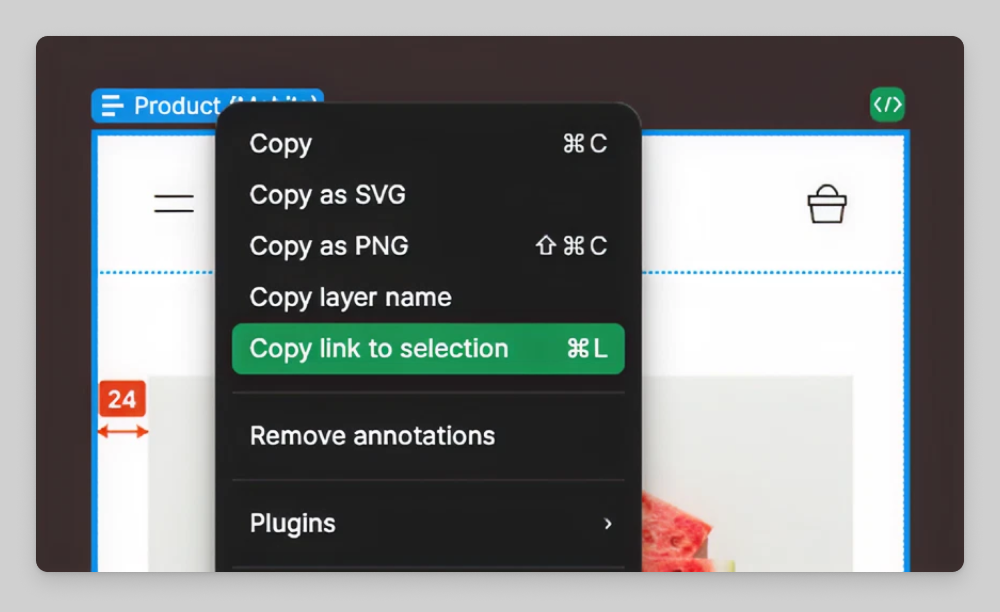
Getting design context and code from files is link-based. To get design context:
- In Figma Design, select the layer you want to get design context for.
- Right-click a frame or layer in Figma and select Copy link to selection.
-
In your MCP client, paste the URL and prompt your client to help you implement the design.
Your client won't be able to navigate directly to the selected URL, but it will extract the node ID that is required for the MCP server to identify which object to return information about.
Example: Send UI to Figma
Note: Currently available using the remote Figma MCP server with certain clients. See the table under Connect the MCP server to your editor for a list of supported clients.
Sending the live UI of your web app or site to Figma is done through conversation with your MCP client:
- Prompt your MCP client: "Start a local server for my app and capture the UI in a new Figma file."
- Follow the steps your client provides. Your client will open a browser window for you, or give you a link to follow.
- Use the capture toolbar to capture pages, elements, and states of your web app or site.
- Let your client know when you're finished. Your client will give you a link to open the Figma file that was created.